 ReagentFlow
Seats and payment card
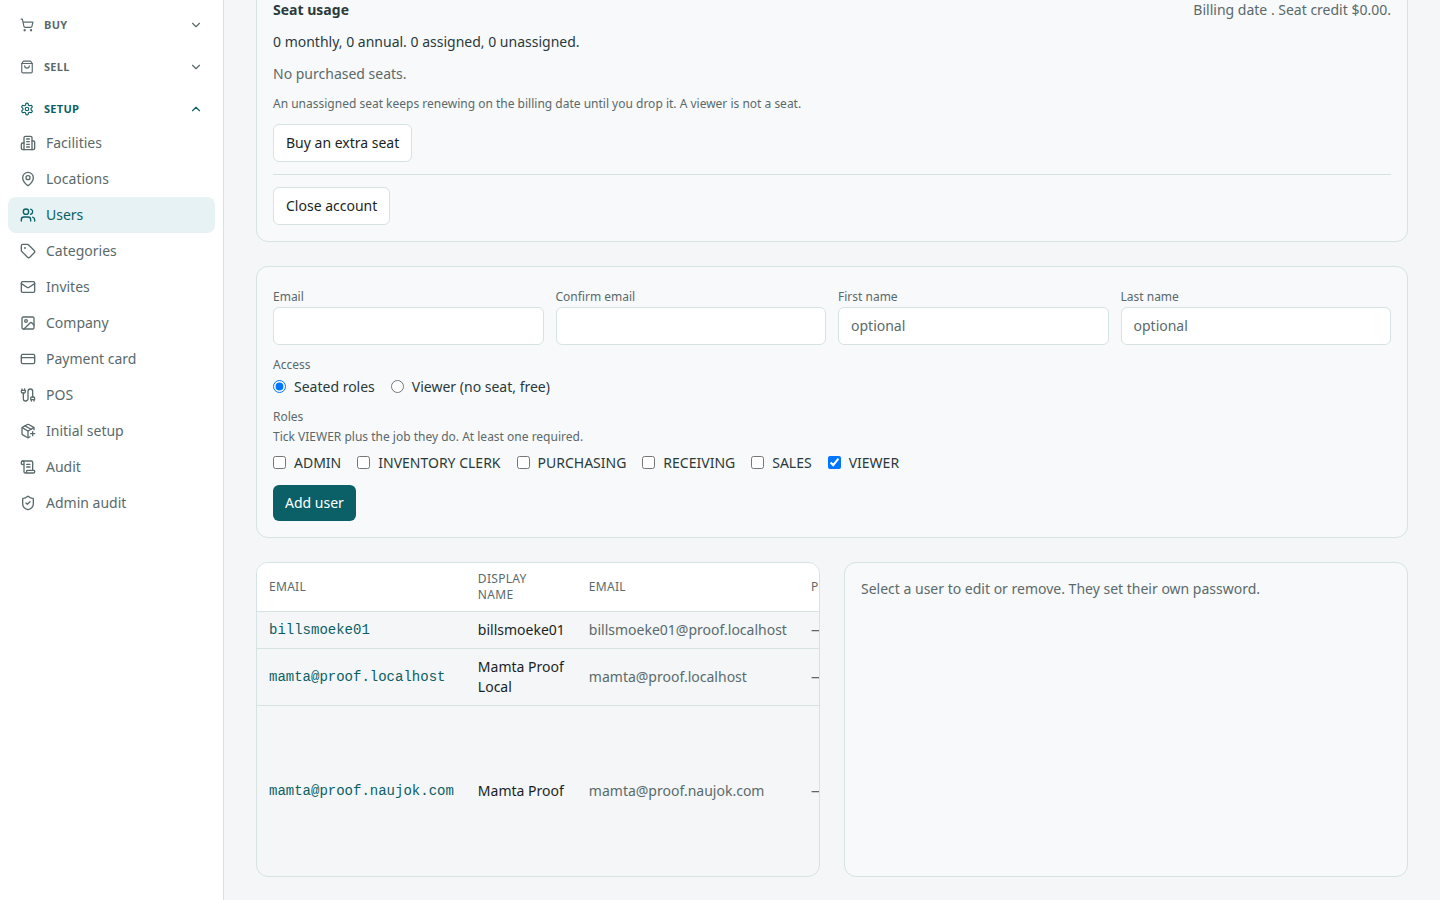
Your company pays per seat. Every person with a job role (ADMIN, INVENTORY_CLERK, PURCHASING, RECEIVING, SALES, and so on) uses one seat. A Viewer (no seat, free) does not. You see and manage seats in the Seat usage panel on Setup → Users, and you save the card that pays for them on Setup → Payment card.
How seats are billed
- Each seat is Monthly or Annual. You pick the plan when you buy the seat.
- A seat starts the moment you buy it and is billed on your account’s billing date, prorated for the first period. On screen: A seat starts now and is billed on your account’s billing date (prorated).
- A person you add or invite with a job role takes a seat straight away, even while the invite is still pending.
- A seat must exist before the person gets a job role. Adding someone with a job role needs a free seat on the plan you pick, and giving an existing person a job role needs them to hold a seat already. Otherwise the app offers Buy a new seat? first (see Users).
- You can hold more seats than people. An unassigned seat keeps renewing until you drop it.
- Dropping a seat inside its first 72 hours earns a seat credit. After 72 hours, a monthly seat’s payment for that month is not credited; an annual seat earns a daily prorated credit for the unused days.
Amounts on these screens come from billing. The guide does not list prices; they depend on your plan.
Read the Seat usage panel
- Open Setup → Users.
- Find the panel headed Seat usage. The heading line shows Billing date [date]. Seat credit [amount].
- Read the summary line, for example 2 monthly, 1 annual. 2 assigned, 1 unassigned.
- The table labeled Purchased seats lists each seat with Plan, Person (the email, or Unassigned), Next billing date, and Actions.
Note under the table: An unassigned seat keeps renewing on the billing date until you drop it. A viewer is not a seat. With no seats: No purchased seats. While loading: Loading seat usage… If billing cannot be reached: Seat usage is not available yet. followed by the reason.
Buy a seat
You can buy a spare seat ahead of time, or let the app ask when you add someone and no seat is free (see Users).
- In Seat usage, choose Buy an extra seat.
- The dialog Buy a new seat? opens with A seat starts now and is billed on your account’s billing date (prorated).
- Pick the Seat plan: Monthly — [price] / seat / month or Annual — [price] / seat / year (the price shows when billing provides one).
- Choose Yes (it reads Buying…), or No to close the dialog.
The purchase is recorded on your company’s billing account straight away, and Seat usage refreshes. A seat bought from Buy an extra seat starts out Unassigned. A seat bought while adding or editing a person goes to that person.
The result is one of:
- Charged [amount]. — the prorated amount was charged now.
- The prorated charge rolls to the next cycle ([amount]). — the charge is added to your next bill.
- Assigned an unassigned seat. No second charge. — when buying for a person and a spare seat existed.
- Seat purchased.
Save a payment card before you buy seats (see Save a payment card).
Drop an unassigned seat
Only seats with no person on them can be dropped. To free a person’s seat, remove the person on Users first.
- In Purchased seats, find a row whose Person is Unassigned.
- Choose Drop seat.
- Choose Confirm drop (it reads Dropping…), or Cancel.
The result is one of Seat credit applied: [amount]., This month’s seat payment is not credited., No unused credit., or Seat dropped. Your seat credit balance shows in the panel heading.
Close the account
- In Seat usage, choose Close account. The app loads a quote (Loading the closure quote…).
- Read the Close account section. There are two cases:
- A seat is inside its first 72 hours. The text reads A seat on this account is inside 72 hours. Choose a prorated seat credit or a prorated refund minus the service fee ([fee], floor $0). The amounts are from billing. Choose Prorated seat credit [amount] or Prorated refund [amount], then Confirm close (it reads Closing…).
- No seat is inside 72 hours. The text reads No refund is offered. Outside 72 hours a monthly payment is not credited. Billing will book [amount] of seat credit for seats that still earn it. This case shows only Cancel; there is no confirm button on this screen.
- Choose Cancel at any point to leave the account open.
After closing: Account closed. Seat credit [amount]. Refund [amount]. The panel then says This account is closed. If the quote cannot be loaded: Closure quote is not available yet.
Save a payment card
Page title Payment card (Setup → Payment card, /billing/card). Text on screen: Save a card for this Stripe account. Keys are not entered here.
- Open Setup → Payment card. Wait for Starting card entry… to finish.
- Enter the card in the secure card form (provided by Stripe).
- Choose Save card (it reads Saving…).
- If your bank asks you to confirm the card, finish that step. You come back to Card confirmation (
/billing/card/return), which shows Checking the card….
Results:
- Card saved. on the card page, or Card saved. You can buy seats for this account. on the confirmation page, with links Payment card and Continue to users.
- The card is processing. — check back later.
- The card was not saved. (sometimes with Try again. or the bank’s reason) — choose Try the card again.
If you returned from your bank in another way, use Already returned from the bank? on the card page to open the confirmation page. If your sign-in lapses during the bank step, sign in again; the app brings you back to the card page.
Other messages: This sign-in has no company, so there is no card to save. and Card entry needs the Stripe publishable key in the app config. (the installation is not set up for card entry yet; tell your administrator).
TODO screenshot: Payment card with the card form and Save card, and the Card confirmation success state — routes /billing/card and /billing/card/return, role ADMIN.
Billing provider (global administrators)
Which billing provider a company uses is set by a global administrator on Tenants. No payment keys are typed into ReagentFlow screens.